Tag Archives: culinary tips

The best of burgers

We could debate forever about grilled versus griddled burgers. And, while we’re at it, about charcoal versus gas grills. But let’s say you don’t have a grill. Or mabe it’s below-freezing outside. How do you make a great burger without leaving your kitchen?

Beef BurgerFirst, I need to explain the difference between English-English and American-English. In American-English, grilling is a form of cooking that involves dry heat applied to the surface of food, commonly from above or below. Grilling usually involves a significant amount of direct, radiant heat, and tends to be used for cooking meat and vegetables quickly. Food to be grilled is cooked on a grill, a grill pan, or griddle. Broiling is like grilling, only turned on its head. Broiling is when the heat is applied from above the food. In English-English, grilling is like American broiling. It’s also used for barbeques etcetera when the food rests on a metal grill. The other stuff is ‘pan fried’ or simply ‘fried’. So far; so complicated. So I shall try and explain as I go.

It seems to me that there are three basic cooking methods you can adopt to cook a burger indoors. The first is to broil your burger under the oven grill (that’s grilling in English-English). The second is to ‘grill’ it in a ridged grill pan (that’s pan-fried in English-English). And the third is on the stove top in a flat-bottomed skillet or frying pan (that’s also pan-fried in English-English).

The good news is that all three methods produce tasty burgers. But there are some tips and tricks that apply to every method. In other words, whether you want to griddle or broil is your call. Just don’t forget to follow these rules for success.

1. Don’t skimp on the fat.

Ground beef (minced beef) is classified according to its fat content. This is important in all ground beef recipes, from meatloaf to meatballs, but especially so when it comes to burgers. My own preference is for a burger with 20 percent fat and 80% meat. That may sound like a lot of fat, but if you’re making burgers, make them right! This fat content yields a juicy, full-flavoured result. Leaner options flirt with blandness and dryness. And a higher fat content risks a greasy burger.

2. Season immediately before cooking.

After you form the burger patty and you are ready to cook it, season the heck out of it with kosher salt (or rock salt) and freshly ground black pepper. But don’t season it before you’re ready to cook. Mixing the ground beef with salt (like you would with meatloaf or meatballs) affects the texture of the meat, making it tougher. By seasoning the outside just before you cook, you get a fabulous, full-flavour, super-tender beef patty.

3. Get the pan (or broiler) crazy hot.

What’s so great about grilling burgers? The smoky char you get from a blazing-hot grill. So by fully heating your pan or broiler, you’re treating your burger to the intense heat it deserves. That’s what creates the crustiest crust, which is as much about textural contrast as it is about big-time flavour. For bonus points, you can heat your pan under the broiler before adding the burger to the pan. That allows you to have a rare burger with a deep rich crust.

Italian Style BurgerFor a burger with a difference, why not try Italian Style Burger? The addition of a little Pecorino Romano to the burger mix and then the melted Provolone cheese on top really does make it feel like Tuscany on a sunny day.

Cooking tender Chicken

Chicken paillardMany people avoid chicken breasts because they find them dry, tasteless and boring. Others choose the breast (preferably without the skin) and avoid the darker meat of the leg and thigh. Personally, I’m in the breast meat camp while my wife is in the dark meat camp. I’m perfectly happy with properly cooked, flavourful white meat on my plate. But when eating out, that becomes a problem because properly cooked chicken breast is hard to find.

Overcooked chicken breast can be found in restaurants around the world. People often choose a plain chicken breast as the option that raises the least dietary fears. With no fat, no sauce and scant seasoning, a chicken breast provides the diner with guilt-free, bland protein.

But it doesn’t have to be like that! It’s both possible, and easy to produce a tender chicken breast that even the dark meat eaters would be happy with. There’s no secret, but there is one cardinal rule: don’t overcook the chicken.

In its natural state, a chicken breast is tapered, but if you make it the same thickness end-to-end you’ll achieve a more consistent finish. To do so, you can pound the breast into a paillard. The word comes from the French ‘paillarde’, from Monsieur Paillard, a late 19th century French restaurateur. It is, in fact, a scallop, especially of veal or chicken, that is pounded flat and grilled or sautéed quickly.

Chicken paillardSo, working with one piece at a time, place the chicken between two pieces of plastic wrap and pound with a mallet, a rolling pin, or the bottom of a skillet to an even ½-inch thickness. The paillards will now only take a few minutes in a skillet or frying pan to cook.

I add about 2 tablespoons of oil to the skillet. Once the oil is hot, I cook the chicken until golden brown on one side – 2 to 3 minutes. (Reduce the heat if the meat starts to become very dark.) Turn the chicken and cook until cooked through – about another 30-60 seconds. Let the cooked meat rest for a few minutes to ensure that it will will be fully cooked, but not dry.

If you want to ‘tart-up’ your chicken breast, add some shaved Parmesan or a smear of black olive tapenade and a lemon wedge on the side.

30 nuggets of culinary wisdom

Here are the 30 nuggets of wisdom for when you are entertaining (and even when you are cooking just for yourself).

1: Prepare all your ingredients in advance and have them ready to hand when you start cooking. Once you start cooking you don’t need chaos and distractions.

2: Don’t add too many ingredients, the fewer and the simpler the better. Three main flavors are enough for a single dish.

3: Never cook with wine you wouldn’t drink. If it’s corked, it’s corked. Throw it away.

4: Your hands are the most important tool in the kitchen. Use them in preference to a kitchen utensil whenever you can.

5: Buy the best ingredients and utensils you can afford. Good ingedients will improve your cooking. Good utensils will last a lifetime.

6: Always taste and test. Never serve something that you haven’t tasted, and be prepared to adjust the seasoning as required.

7: Clean up as you go. A chaotic kitchen will lead to chaotic results.

8: When entertaining, don’t use untested recipes. If you want to use a new recipe on your guests, test it out yourself first

9: A botched recipe is actually a great way to learn and do better next time. Just try to botch it when you’re cooking for yourself rather than when you have guests (see #8 above)!

10: Use a recipe as a guide, but make it your own. Don’t be afraid to vary the ingredients and cooking methods to suit yourself.

11: Always use a bigger bowl/pot/cutting board than you think you need.

12: Wherever possible, buy fresh, local produce. You’ll notice the difference in your results.

13: Invest in good knives and treat them well.

14: Trust your senses and your intuition. Don’t rely on a timer; learn to hear and smell the just-done sizzle. It will add to your joy of cooking.

15: Keep it simple. Don’t drown great food in unnecessary sauces (unless you screwed up and need to hide the evidence!)

16: Add spices sparingly. You can always add more, but you can never take away.

17: A little crystalised sea salt makes almost anything taste better — especially vegetables.

18: Always allow yourself extra time. Always.

19: Determine what time you want to serve your main dish, then take account of the timing of each dish and plan everything backwards from that.

20: If you are serving direct onto your guests’ plates, serve just enough of something to make people want more, not so much that their palate gets tired of it.

21: Bearing in mind #20 above, create a feeling of abundance so guests feel like they can indulge in seconds (make sure you’ve cooked enough!)

22: Cook with your guests’ tastes in mind and never serve something you would not eat yourself.

23: Stop fussing and start relaxing at least 15 minutes before people arrive.

24: Aim for a few dishes that don’t have to be served hot out of the oven, that can sit around for a while or be reheated.

25: Always keep a well-stocked bar and serve great wines.

26: Presentation is key; take the time to garnish and wipe the edges of the plates clean.

27: Make sure you have complementary colours in your dishes. Bland food will taste bland.

28: When serving always consider how your food will look on the plates and serving dishes that you want to use. The last thing you want is to have your cooking undermined by plates trying to steal the show.

29: Mise en place means “everything in its place.” Organize and arrange your ingredients where they are easily reached.

30: Never use full heat, except to boil water.

Plan Ahead…

I have always maintained that 90% of the success of a good meal is what goes on hours before it’s put on the table. I am not someone who stays in the kitchen while everybody else quaffs the champagne and scoffs the apperitifs! I like to grab my share while there’s still some left, and have a nice relaxed conversation with my guests. Sure, there are moments I have to pop into the kitchen to keep an eye on something, but I minimise it by preparing as much as possible beforehand.

You know that rectangular beast that stands in the corner of the worktop – it’s called a microwave – make use of it! It’s designed to make life easy, so take advantage. Let me give you an example… mashed potatoes. Make them well before your guests arrive and put them in the serving dish you are going to use. Cover with clingfilm and put them to one side. As you finish preparing the main course, ready to serve, just pop the dish in the microwave for two or three minutes and your mashed potatoes will be perfect and hot. You can do the same with almost any vegetable.

salade des gourmetsPreparation really is 90% of the job!  One of the recipies I love is Salade des Gourmets which is extremely simple, but has a lot of component parts like foie gras, smoked salmon, smoked ham, magret de canard, fresh scallops, fresh prawns. The scallops and prawns are served warm, but everything else is cold, so what I do is cut all the pieces of foie gras, smoked salmon, smoked ham and magret de canard and keep them in the fridge along with the vinaigrette for the salad leaves. Then, when it’s time to plate up, it takes me less than one minute per plate to arrange the leaves, and meats, during which time the scallops and prawns cook quickly and can be added to the plates. 5 minutes for six complex-looking starters is a walk in the park!

The trick is to consider what you are proposing to serve and prepare as much as possible well in advance. Also, you should try and find combinations that make life easier in the kitchen. One of the meals we enjoy includes sauté potatoes, but sauté potatoes must be cooked when needed, otherwise they go soft and soggy. Again, with a little forethought, you can partially cook them and then just throw them in a hot pan for a few minutes at the last moment so they are served nice and crisp.

Most gravies and sauces can be prepared well in advance and reheated just before serving. In fact, you can make gravy days ahead and simply freeze in a container, defrost on the day, then add the juices from your meat to it before serving. Some people parboil and freeze their potatoes to give them a headstart. Others like them cooked from fresh, but you can still get ahead by peeling and cutting them the night before. Keep them in a water-filled container with a generous splash of milk overnight to stop them browning. When you are ready to cook them, rinse first to remove the milk.

Plan ahead, prepare ahead, and your meals will be so much more relaxed and better organised.

No-tears method of peeling Onions

Chopping OnionsOf all the kitchen nightmares the cook has to live with, the one that generates the most problems for many is the peeling and chopping of onions, and the associated tears and stinging eyes.

The reason why it makes you cry is because the synthase enzyme converts the amino acids sulfoxides of the onion into sulfenic acid. The unstable sulfenic acid rearranges itself into syn-ropanethial-S-oxide. Syn-propanethial-S-oxide gets into the air and comes in contact with our eyes. The lachrymal glands become irritated and produces the tears!

Did you get all that, because I just looked it up, and don’t understand a word! To put it simply, chopping onions causes the release of an irritant gas in the air which, when it reaches your eyes, triggers a blinking and tearing reflex designed to wash it away (why didn’t they just say that?)

Not all onions are created equal. The fresher the onion, the less you cry. And not all cooks are sensitive to this phenomenon. Most tips are designed to either hinder the release of the gas, or prevent it from reaching the eyes.

Some people rinse the onions in cold water after peeling, or chop them underwater. Some recommend keeping onions in the fridge, or placing them in the freezer for a few minutes before chopping. Some chop from the stem end down, others from the root end up. Some recommend breathing through the nose, others only through the mouth, while others still hold a sip of water in their mouth, and try not to laugh and spit it out. (Honest, that last one is true).

Some report lachrymal immunity when they wear contacts or chew gum, others suggest putting on lab goggles or a snorkeling mask. Some boast they keep their knives so sharp it’s never a problem, others strive to keep their face well away from the chopping board. Romantics like to keep a lit candle by their chopping board, others opt to simply cry it out.

Pain au Levain - Sourdough BreadI’ve only tried a few of these tips myself, but one I hadn’t read about was this intriguing tip, which suggests that you to hold a piece of bread in your mouth as you chop. But it has to be pain au levain. Pain levain is a leavened bread, or sour dough bread. That is to say a mixture of water and flour where a culture of yeast and lactic acid bacteria develops. This fermentation, releases carbon dioxide and allows the dough to rise.

So off I set to the boulangerie because such an unusual tip could not go untested. Using the butt end of the loaf and feeling both experimental and silly, and with a saliva-soaked piece of bread hanging from my mouth, I went about like a mad thing, chopping onnions till my knife went blunt. I’m happy and amazed to report it worked perfectly.

The rationale, I gathered from a little research, may be that the piece of bread absorbs some of the irritant gas before it can reach the eyes. In fact, since trying the pain au levain, I have read that a lump of sugar works just as well. And the fact that you have to concentrate on not drooling on your chopping board may also make this a good hiccup cure! It’s certainly worth a try.

I don’t think I’m going to see this tip demonstrated on TV cooking shows anytime soon, but in my own kitchen, I set the rules of what’s classy and what’s not. (Though maybe I’ll stick with the sugar cube next time!)

How to Open Scallop Shells

scallops in their shellsOf course, your fishmonger will open your scallops for you. In fact, they mostly sell just the flesh. But there is seriously nothing better than a FRESH scallop, as we discovered the other day as we went to the market. Most people are simply afraid of what’s inside a scallop and are not sure what to keep and what to throw away, but it’s drop-dead simple, and here’s how you do it…

Hold the scallop shell flat in your left hand (assuming you are right-handed), with the curved side down and the flat side up. If you have a scallop with both halves curved, it’s normally white side down and dark side up! Keep the round edge facing you then insert the end of a round-tipped knife (or a small spoon) in the join to the right of the shell. Work the knife towards you then rotate it a little to open the two halves enough to allow you to wedge the fleshy part of your left thumb in the gap, and keep the shells apart.

Using the dull edge of the knife blade, scrape the inside of the top shell until you feel the two parts of the shells separate (you have simply cut or broken the muscle that was holding the shells together). Discard the top half of the shell then place your left thumb firmly on the scallop muscle. Still holding the knife in your right hand, insert the tip carefully beneath the grey-black mass (the viscera) that’s next to the round, white muscle. Hold the mass gently between the knife and your right thumb, lift it up, and pull it gently towards you. You will feel a layer of skin come cleanly off the scallop muscle, along with the “innards”.

scallop in its shell
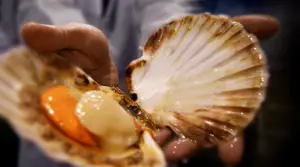
You will now be left with just the edible muscle, though it may be a little gritty with sand, which you can easily rinse off under cold running water. Now you are free to eat them raw from the shell or create any one of a dozen delicious recipes like my favourite, A Trio of Scallops